I'm pleased to announce the launch of a new page on my website! Presenting: the Media Log. This will be where I record all the games I beat, the movies I watched, the books I read, and so on. Basically, I've finally moved my media thread away from blogging social media like cohost and tumblr to my own website, like I said I would. I don't think I can figure out how to create a new RSS feed for that, so I'll just mention new entries in the Updates RSS feed, so follow that to keep up with my media log, along with website updates and new Megacollection entries.
To commemorate this, I've got one last entry for my 2024 media thread:
In 2024, you played 58 games on retroachievements.org and unlocked 286 achievements, earning you 1121 hardcore points and 5 softcore points. You submitted new scores for 186 leaderboards. You spent 67 hours playing games across 11 systems. 28 hours and 53 minutes of that were playing GameCube games. You beat 4 games on hardcore. Your most played game was Mother 3 at 16 hours and 24 minutes. Your rarest achievement earned was Crazy Drift Challenge - Amateur from Crazy Taxi, which has only been earned in hardcore by 1.10% of players. You made 1 forum posts.
copied from the email they sent me.

i spent some time over the past week making these babies. but it was a fucking time so i'm gonna tell you how i did it.
if you've known me for more than 10 minutes, you will probably know this. i also collect playing cards of all kinds. i don't collect french playing cards anymore unless the design is standout/unique in some way. and then i came across this video:
i wanted them. i wanted 3d printed playing cards and they look so good! i found the model from the maker on Cults3D and bought the design, loaded it into my slicer and found out, this design is best formatted for multi-filament printers.
i don't have a multi-filament printer. i could go buy the add on that allows that for $250, but i don't have $250 to drop on that upgrade right now. but i still want my 3d printed cards.
examining the file in the slicer and watching the preview play out made me realize that the way that this is printed is that there are specific base color layers and then the additional color layers. the logic was that if i printed the base layers, then switched the color of my filament halfway through the print, then let it continue printing then i could get the color in.
i use a bambu a1 mini and they have a really convenient thing where you can pause a print at a specific layer and then the print will pick right up where you left off. really nice. (you right click the layer preview bar on the right side of the preview window in the slicer and click "add pause" if you didn't know how to do that.)
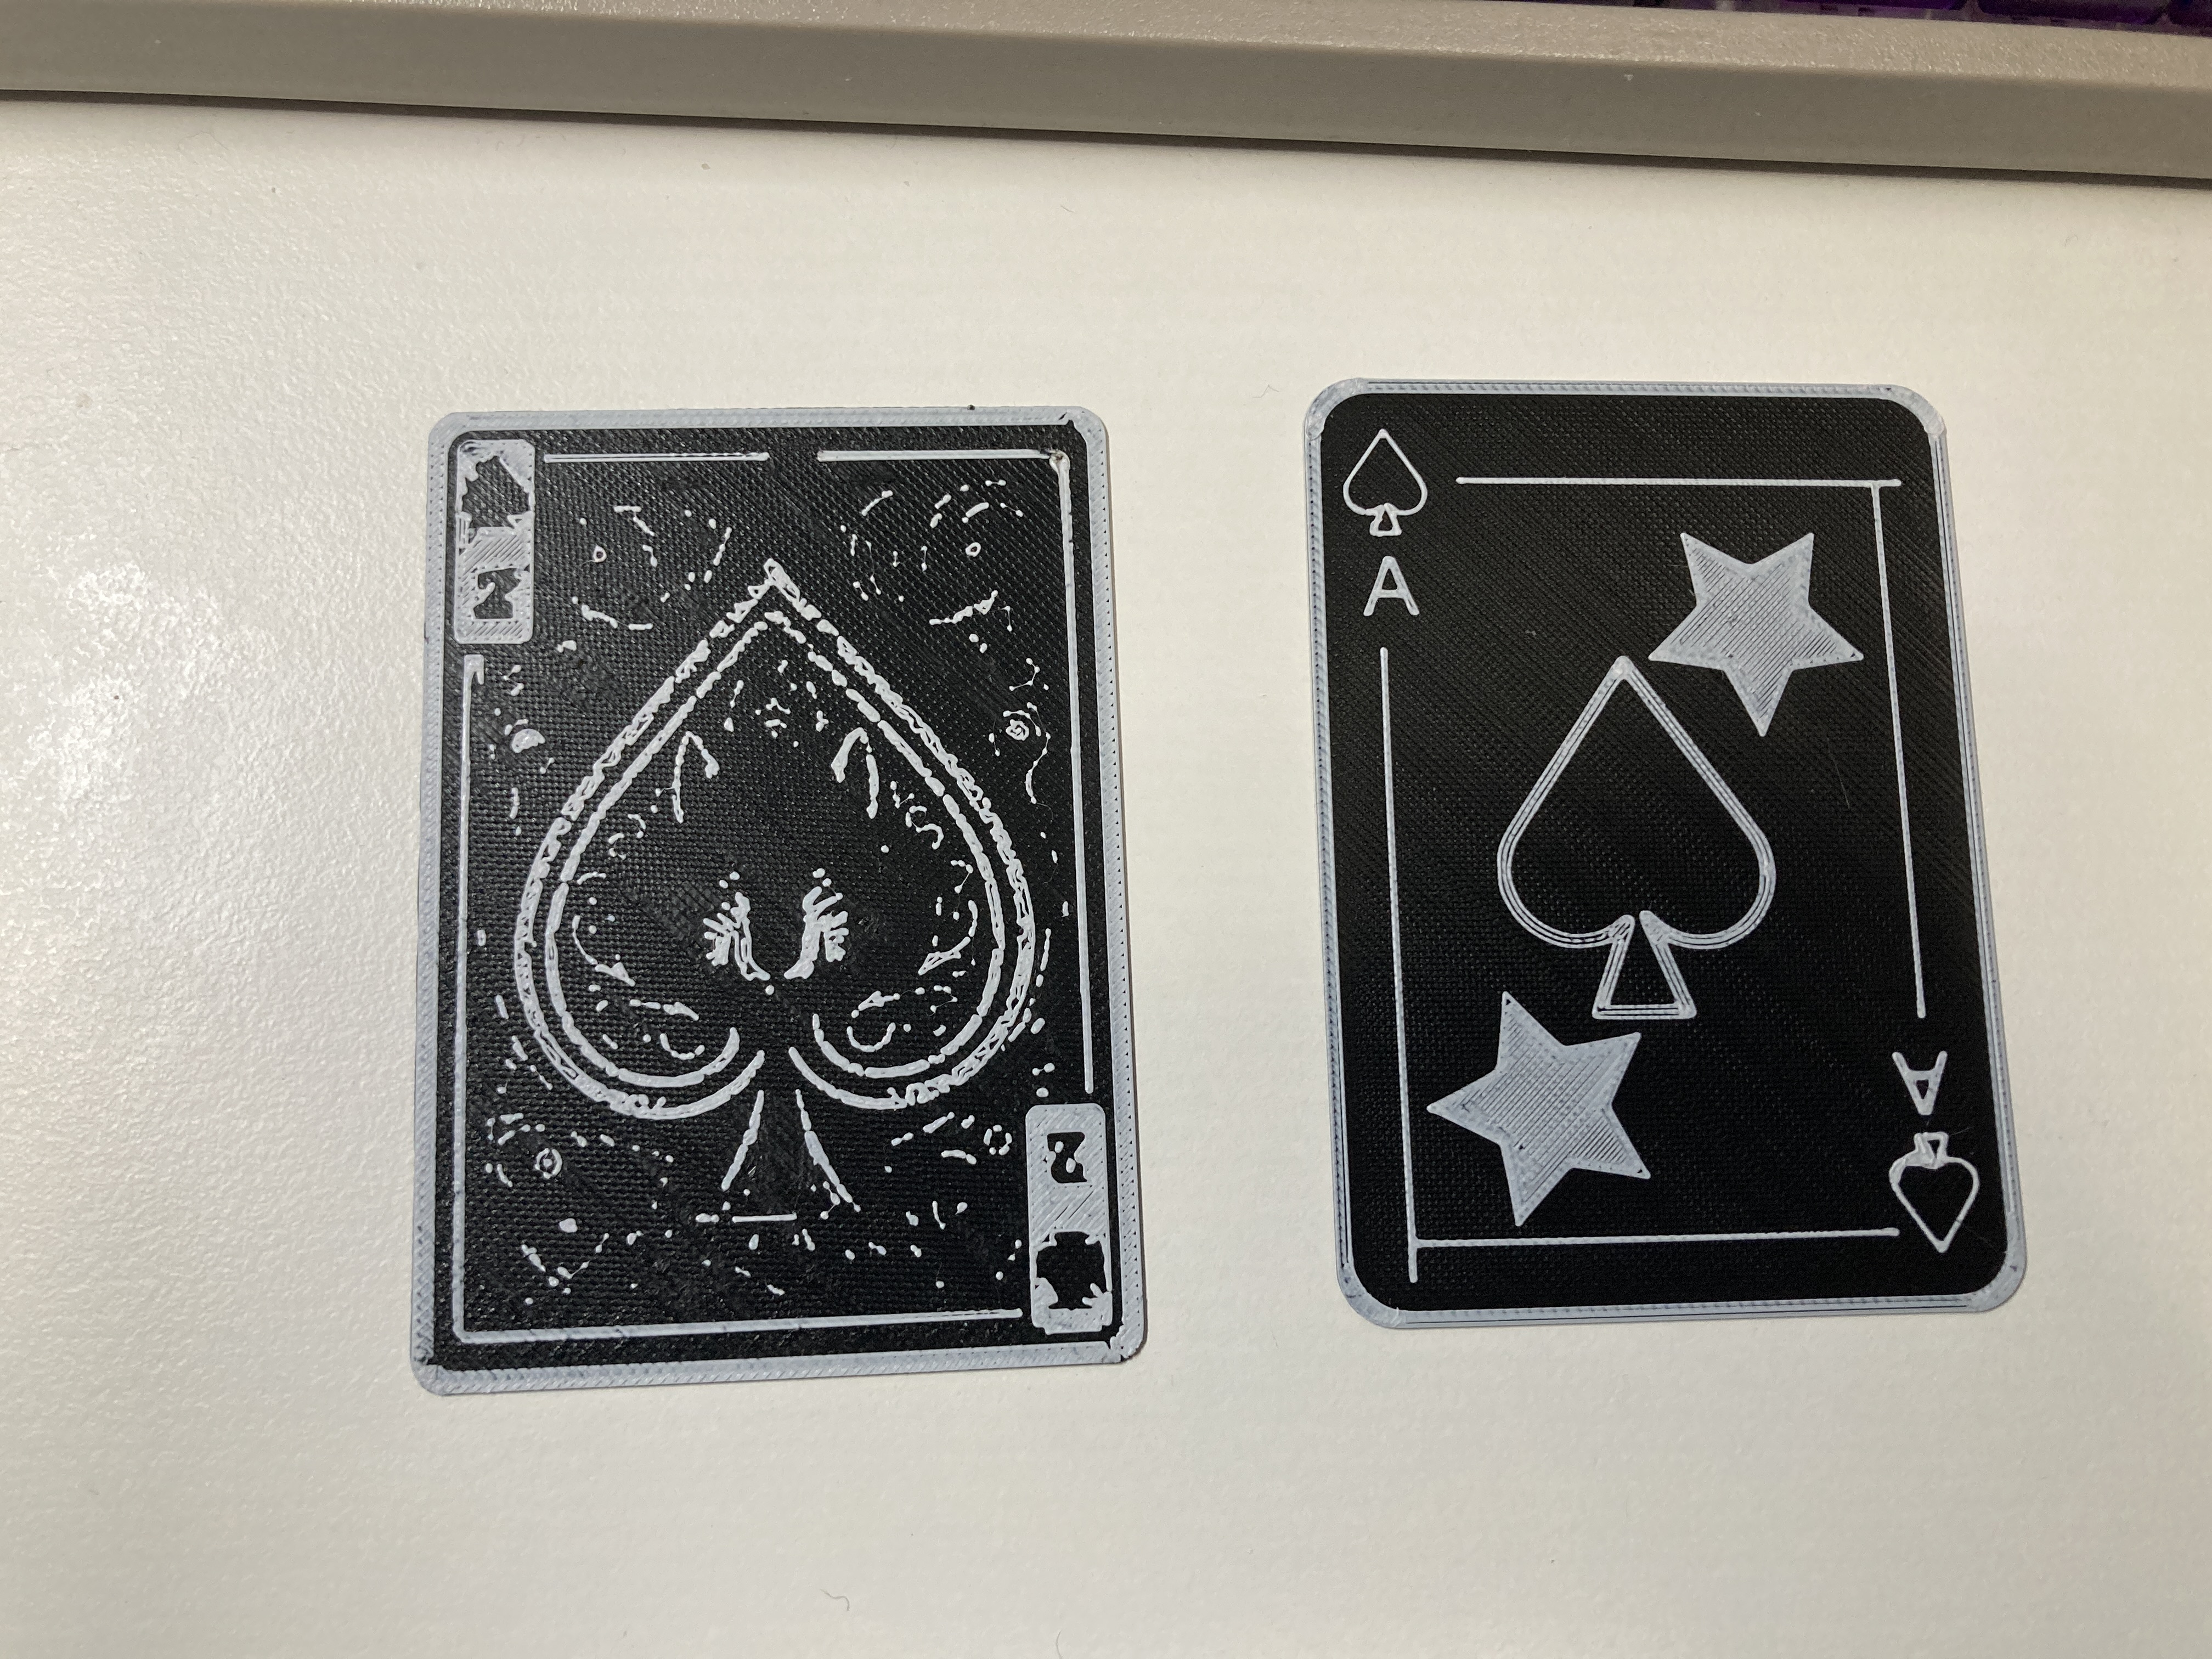
i tried it with one of the cards from the set, and it… didn't work. i even changed stuff around so i was printing with a 0.2mm nozzle so i could get as many of the "color" layers laid down as i could. but when you take a color specific print and take out the colors, they all just want to print in one go and ignore details and they get enveloped in the surrounding areas. so i got this as a result:
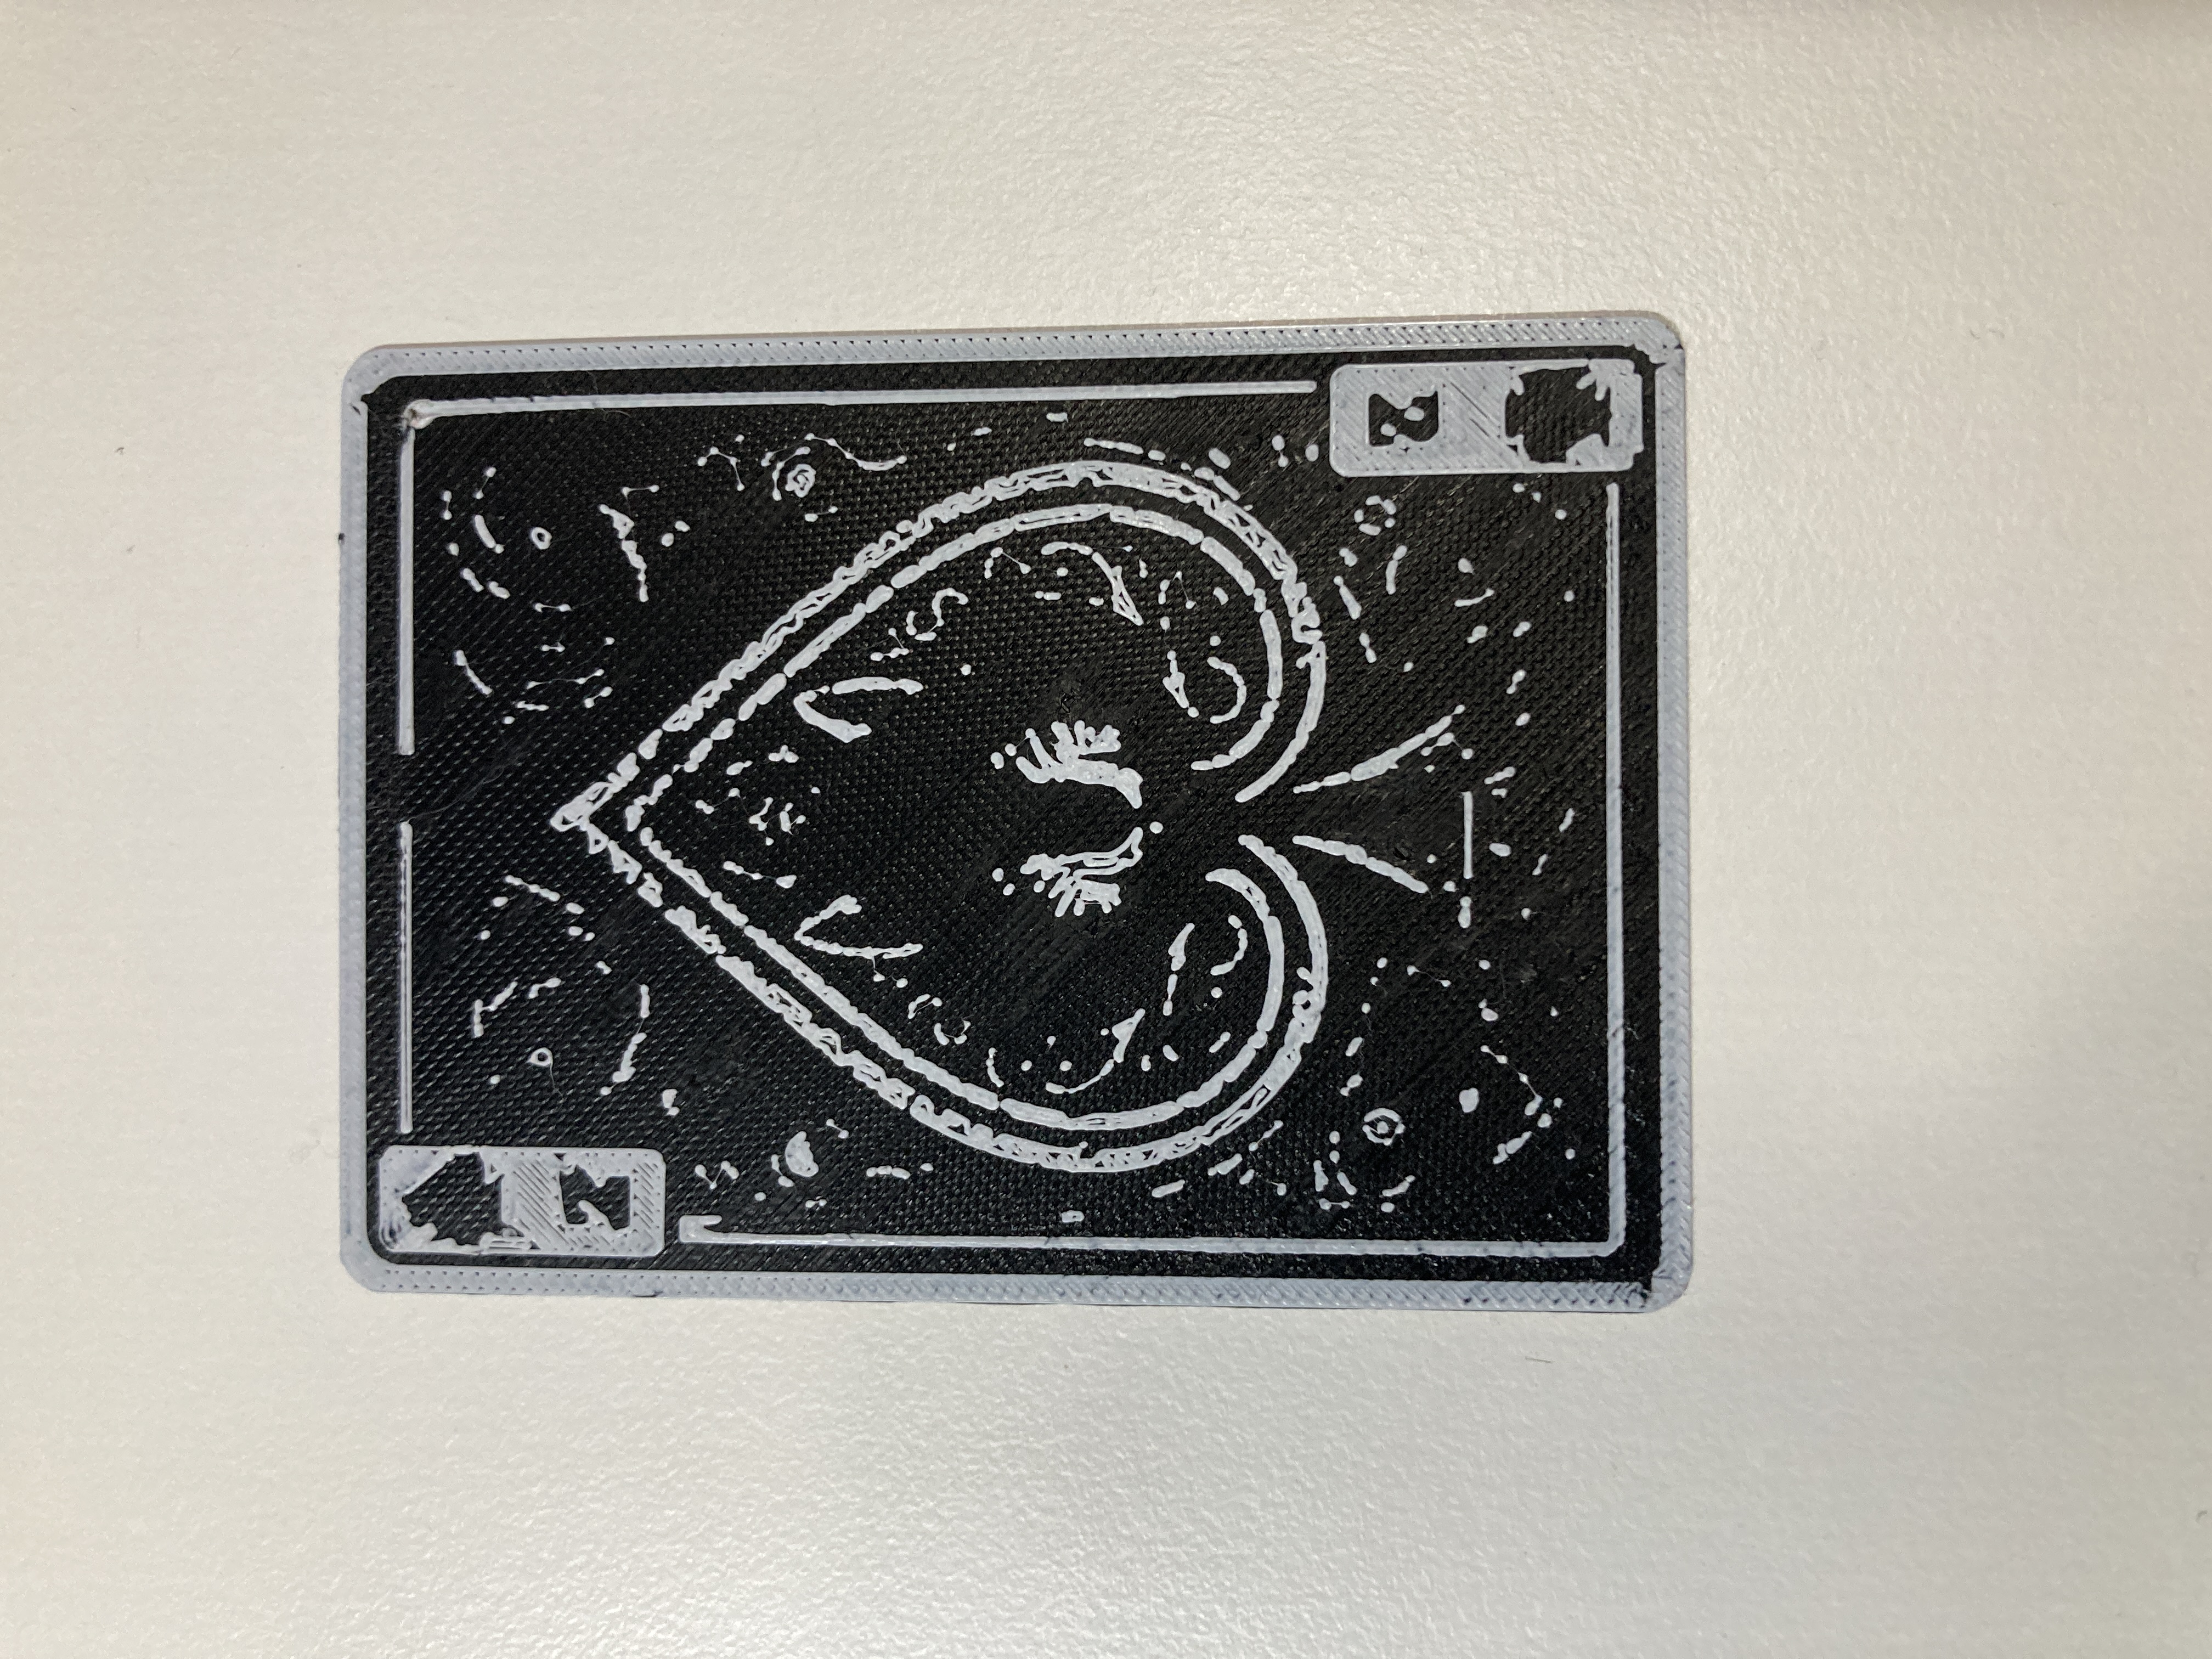
with this as the card that it was trying to print:
subpar result. but it did prove that i was right, if i just created a model that was at a specific layer height above the base, paused the print, changed the filament, and let it finish, then it would work!
so the magic was in the layers, that would be easy to figure out and model. the game plan then became make a card base model, then get all the card "content" as models and then make… 52 card models lol.
i made up a really shitty ace design, threw it in a png to stl program. that was the easy part. i made a card base model in tinkercad. i love tinkercad. its babbys first 3D modeling software but i haven't yet wrapped my head around blender just yet, and tinkercad does everything i need it to for the modeling i do so far, which is usually just 3d printing related.
my card model is 63.5mm x 88.9mm (or 2.5in x 3.5in) which is about a standard card size. there's slight variation in certain types of cards but so long as my cards are uniform then it doesn't really matter.
the thickness of the card is what i really had to mess with, a magic card is about 0.3mm thick, and the 3d printed playing card i think was around 0.36mm thick. i made printing tests with 0.2, 0.3, and 0.5mm thick cards. i was printing all of these with a 0.08mm layer height so i could be certain i was controlling what existed on what layer if i changed what height it went to on the card.

in this photo, my tests are ordered the 0.5, 0.2, and 0.3. the 0.2mm with white filament ended up being too transparent, which i used the sticker underneath to demonstrate. printing the base layer with black filament would make it much more opaque, though because its plastic put down in layers, if you hold them up to a lamp the "printing" could be seen. just don't play with these if you have a lamp for a head i guess?
but the other two tests revealed that 0.5mm is a bit too thick (i also messed up and didn't change what layer it paused at so it is dark, but it is a single black layer on top of a white base which makes it a little grey which is a nice effect to note). 0.3mm was ok but felt a little thin yet.
i tried again at 0.4mm (i was kind of circling around this number since that first card was 0.36mm) and that turned out to be the best and felt the most like that first one in stiffness.
i also tried printing on my special build plate that gives a starry texture on the backside of whatever is printed, but one of the tests fucked up in a way i don't even know how it messed up and ripped a hole in one side of the build plate… luckily the plate is double sided but that happened when i was still trying to use my 0.2mm nozzle.

my poor build plate…
i switched to the 0.4mm nozzle after that and haven't had any problems since then. all these prints are still just as capable with the 0.4mm nozzle.
now that i had the perfect layer height, i had to start making the other cards. the number cards were easy, they are usually only just one color so i could use red filament for the red cards and white filament for the black cards. the face cards though… that became a bit of a question.
i tried messing around with the standard french playing card faces:
i tried to extract as much detail as i could out of the design, which i managed by rendering the card in pure binary black and white, making it an svg, and then making that svg an stl. (thats a simplified version of the process, it was much more annoying until i realized tinkercad lets you just import svgs and it turns them into 3d models)
the problem with this method though is that there is a massive loss of detail in both directions depending on how much is captured in the svg. do i let the face be very defined and the bodies lose detail? or do i let the face lose detail and the bodies have more design?

i wasn't really happy with either of these results, it was really impressive how much detail i could capture, but i was using a png converted to an svg which caused a detail loss problem. i should've just found an svg in the first place.
so i went and found svgs in the first place. wikimedia commons has a bunch of public domain/CC0 license playing card files. they have a bunch of classic ones and ones that people have uploaded for the specific purpose of being public domain.
i wanted to work with a single color file as much as i could, and thankfully there's this collection by someone named "ToasterCoder". so i edited all the svgs to knock out the background and border, imported them all into tinkercad, put them on my card base, export them, and now i have my cards to print!
i don't think it's gonna work for these types of cards. i don't even think the original set i took inspiration from for this project had cards backs.
for the record i did consider finding a way to do a backing, but we're working with really think layers of plastic here. i would have to add an extra layer so that the opacity wasn't a problem so the cards would be getting even thicker
i also considered making some kind of sticker to put on the back but that'd also increase the height of the card and i'd have to place them all by hand which could lead to them being identifiable.
while my special build plate could be used to make a backing, it also almost got ruined by a previous attempt, and the sparkles disappear when it gets full of fingerprints, and there are minor imperfections in the build plate that keep getting captured in the back of the card because its smooth.
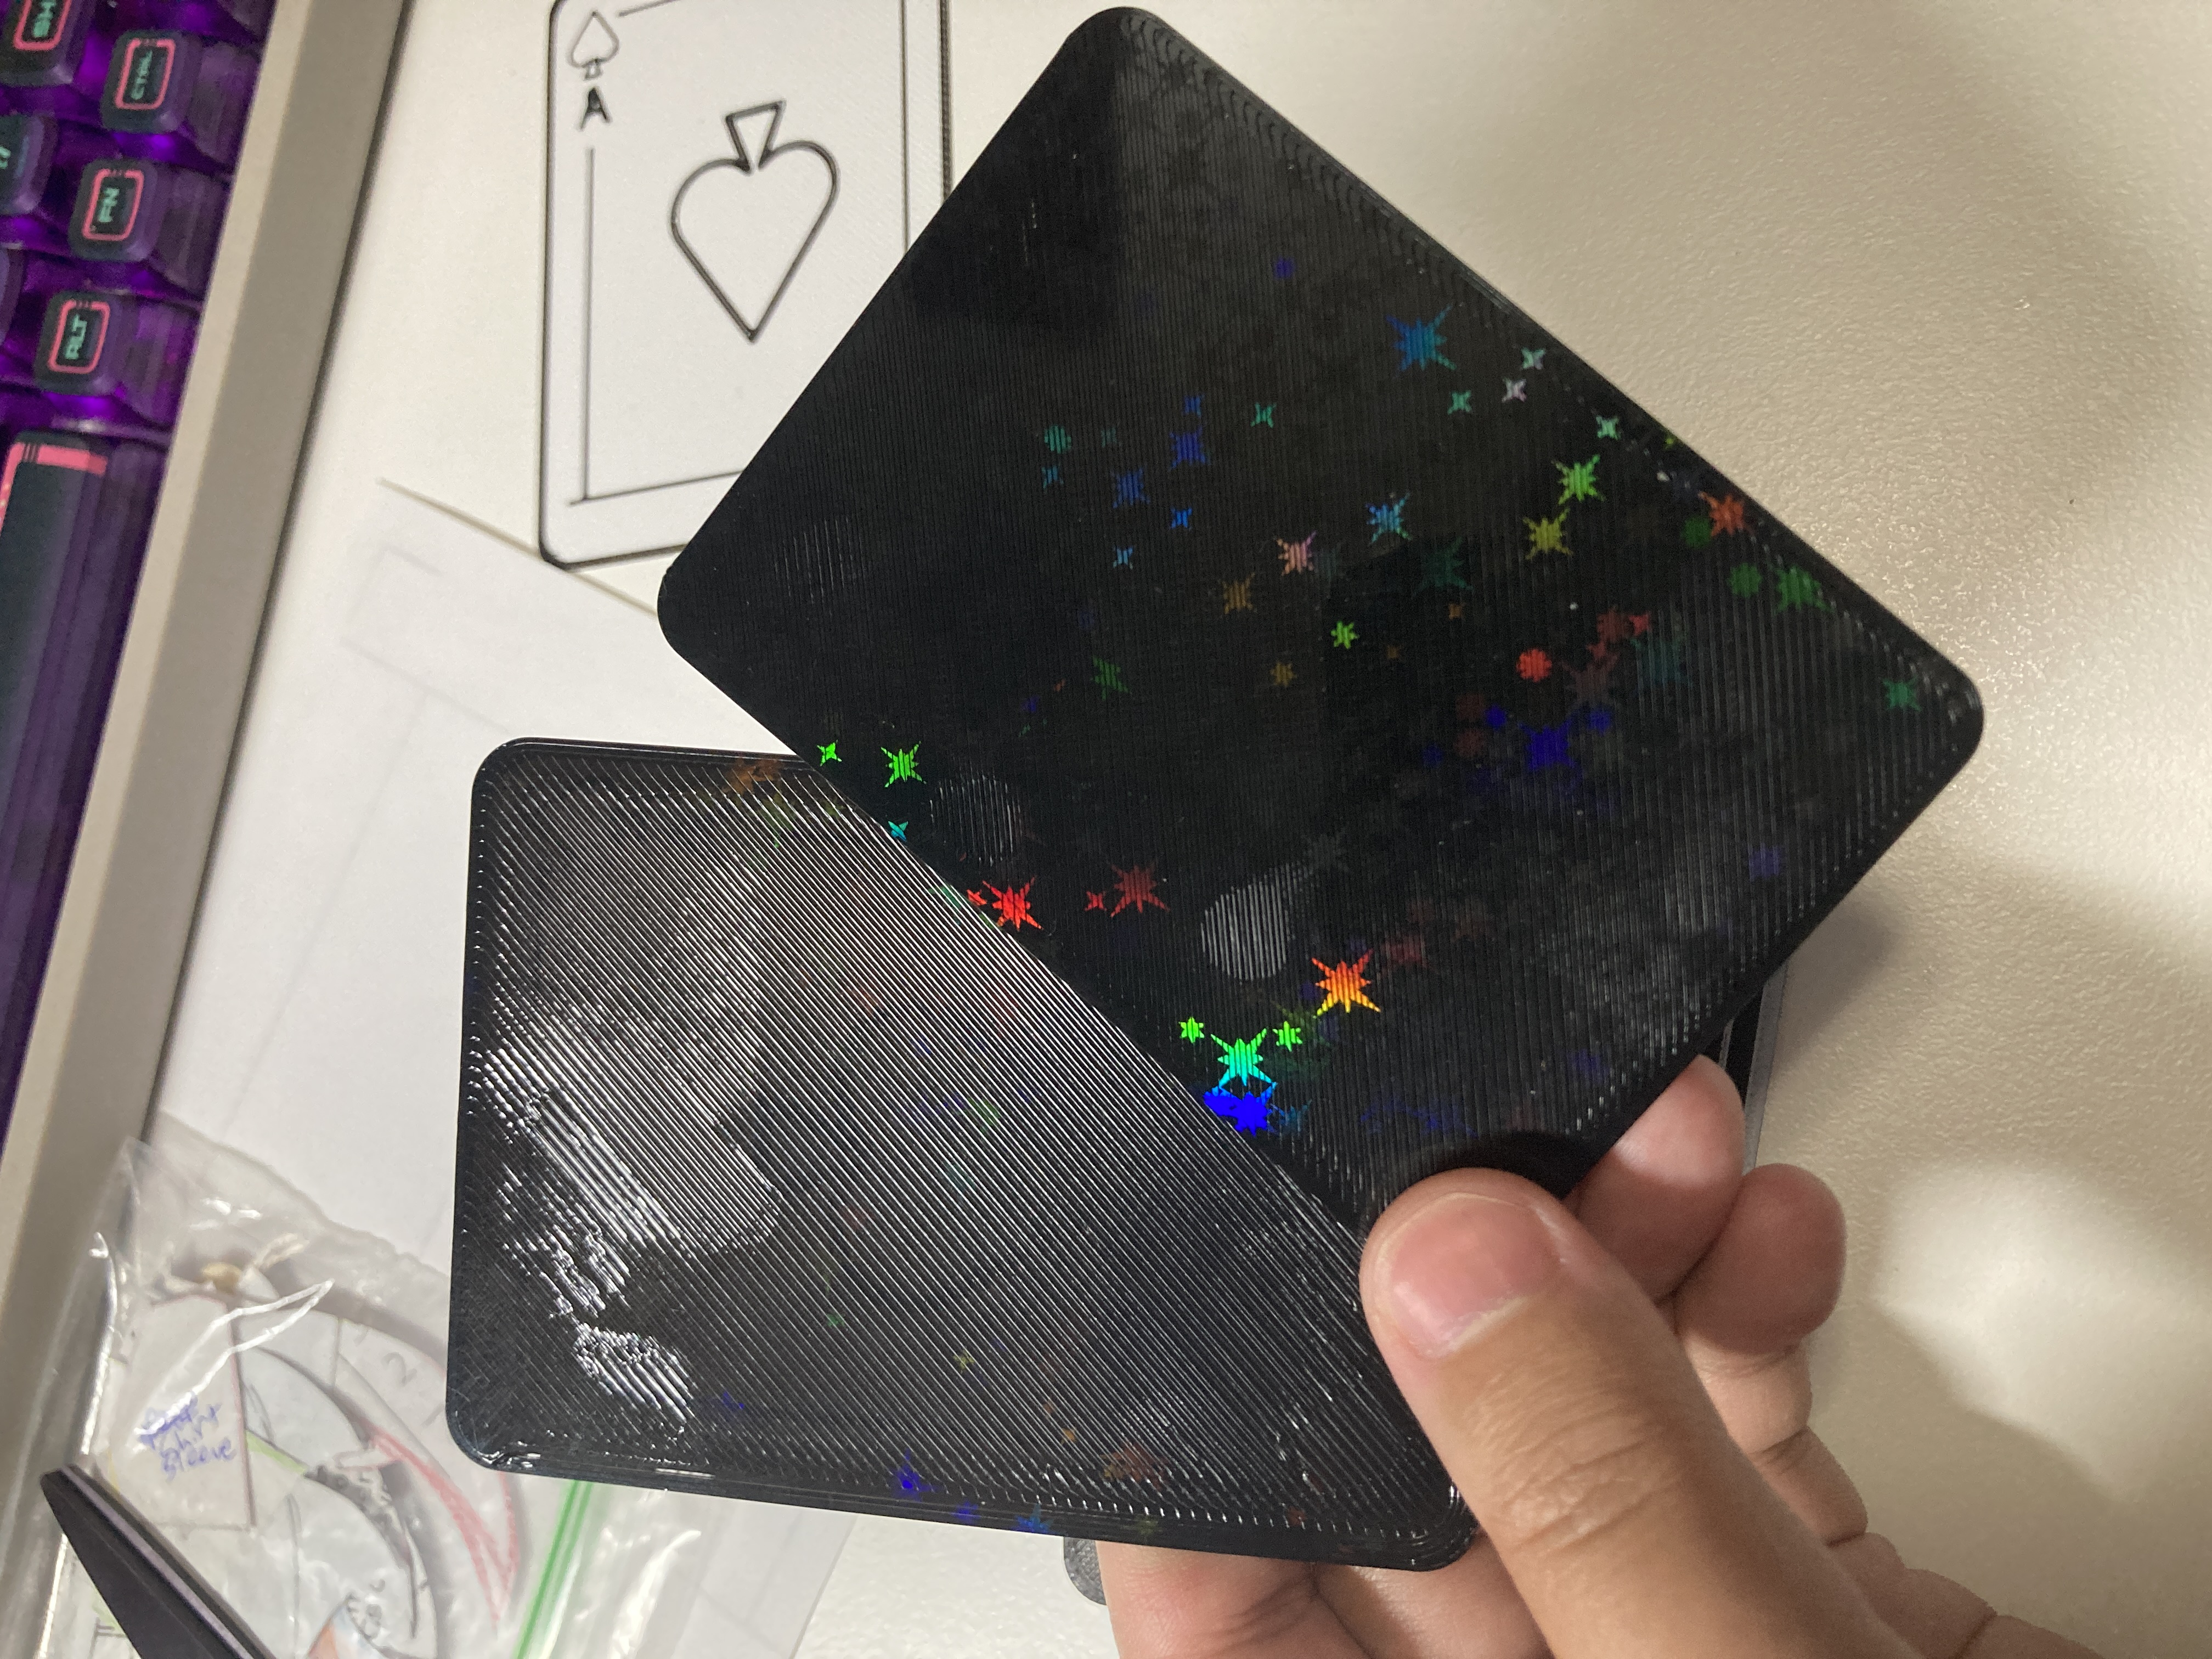
both of these were printed on that sparkly build plate, but the left one i had been handling for a bit so the sparkly stuff wasn't as visible. additionally you can already see that circle surface imperfection on the right one.
using the textured build plate with a specific bottom surface infill pattern is the best i can do for the moment. the octagram spiral is probably the most "card-like" back that is present.
while i was putting together the card models and waiting for more tests to print, i was playing around with the tests i already had printed and i realized something. the nice border i made would work against me if i used different color filaments. you can see where there's a white or red card in the stack if you look at the edge of the card.
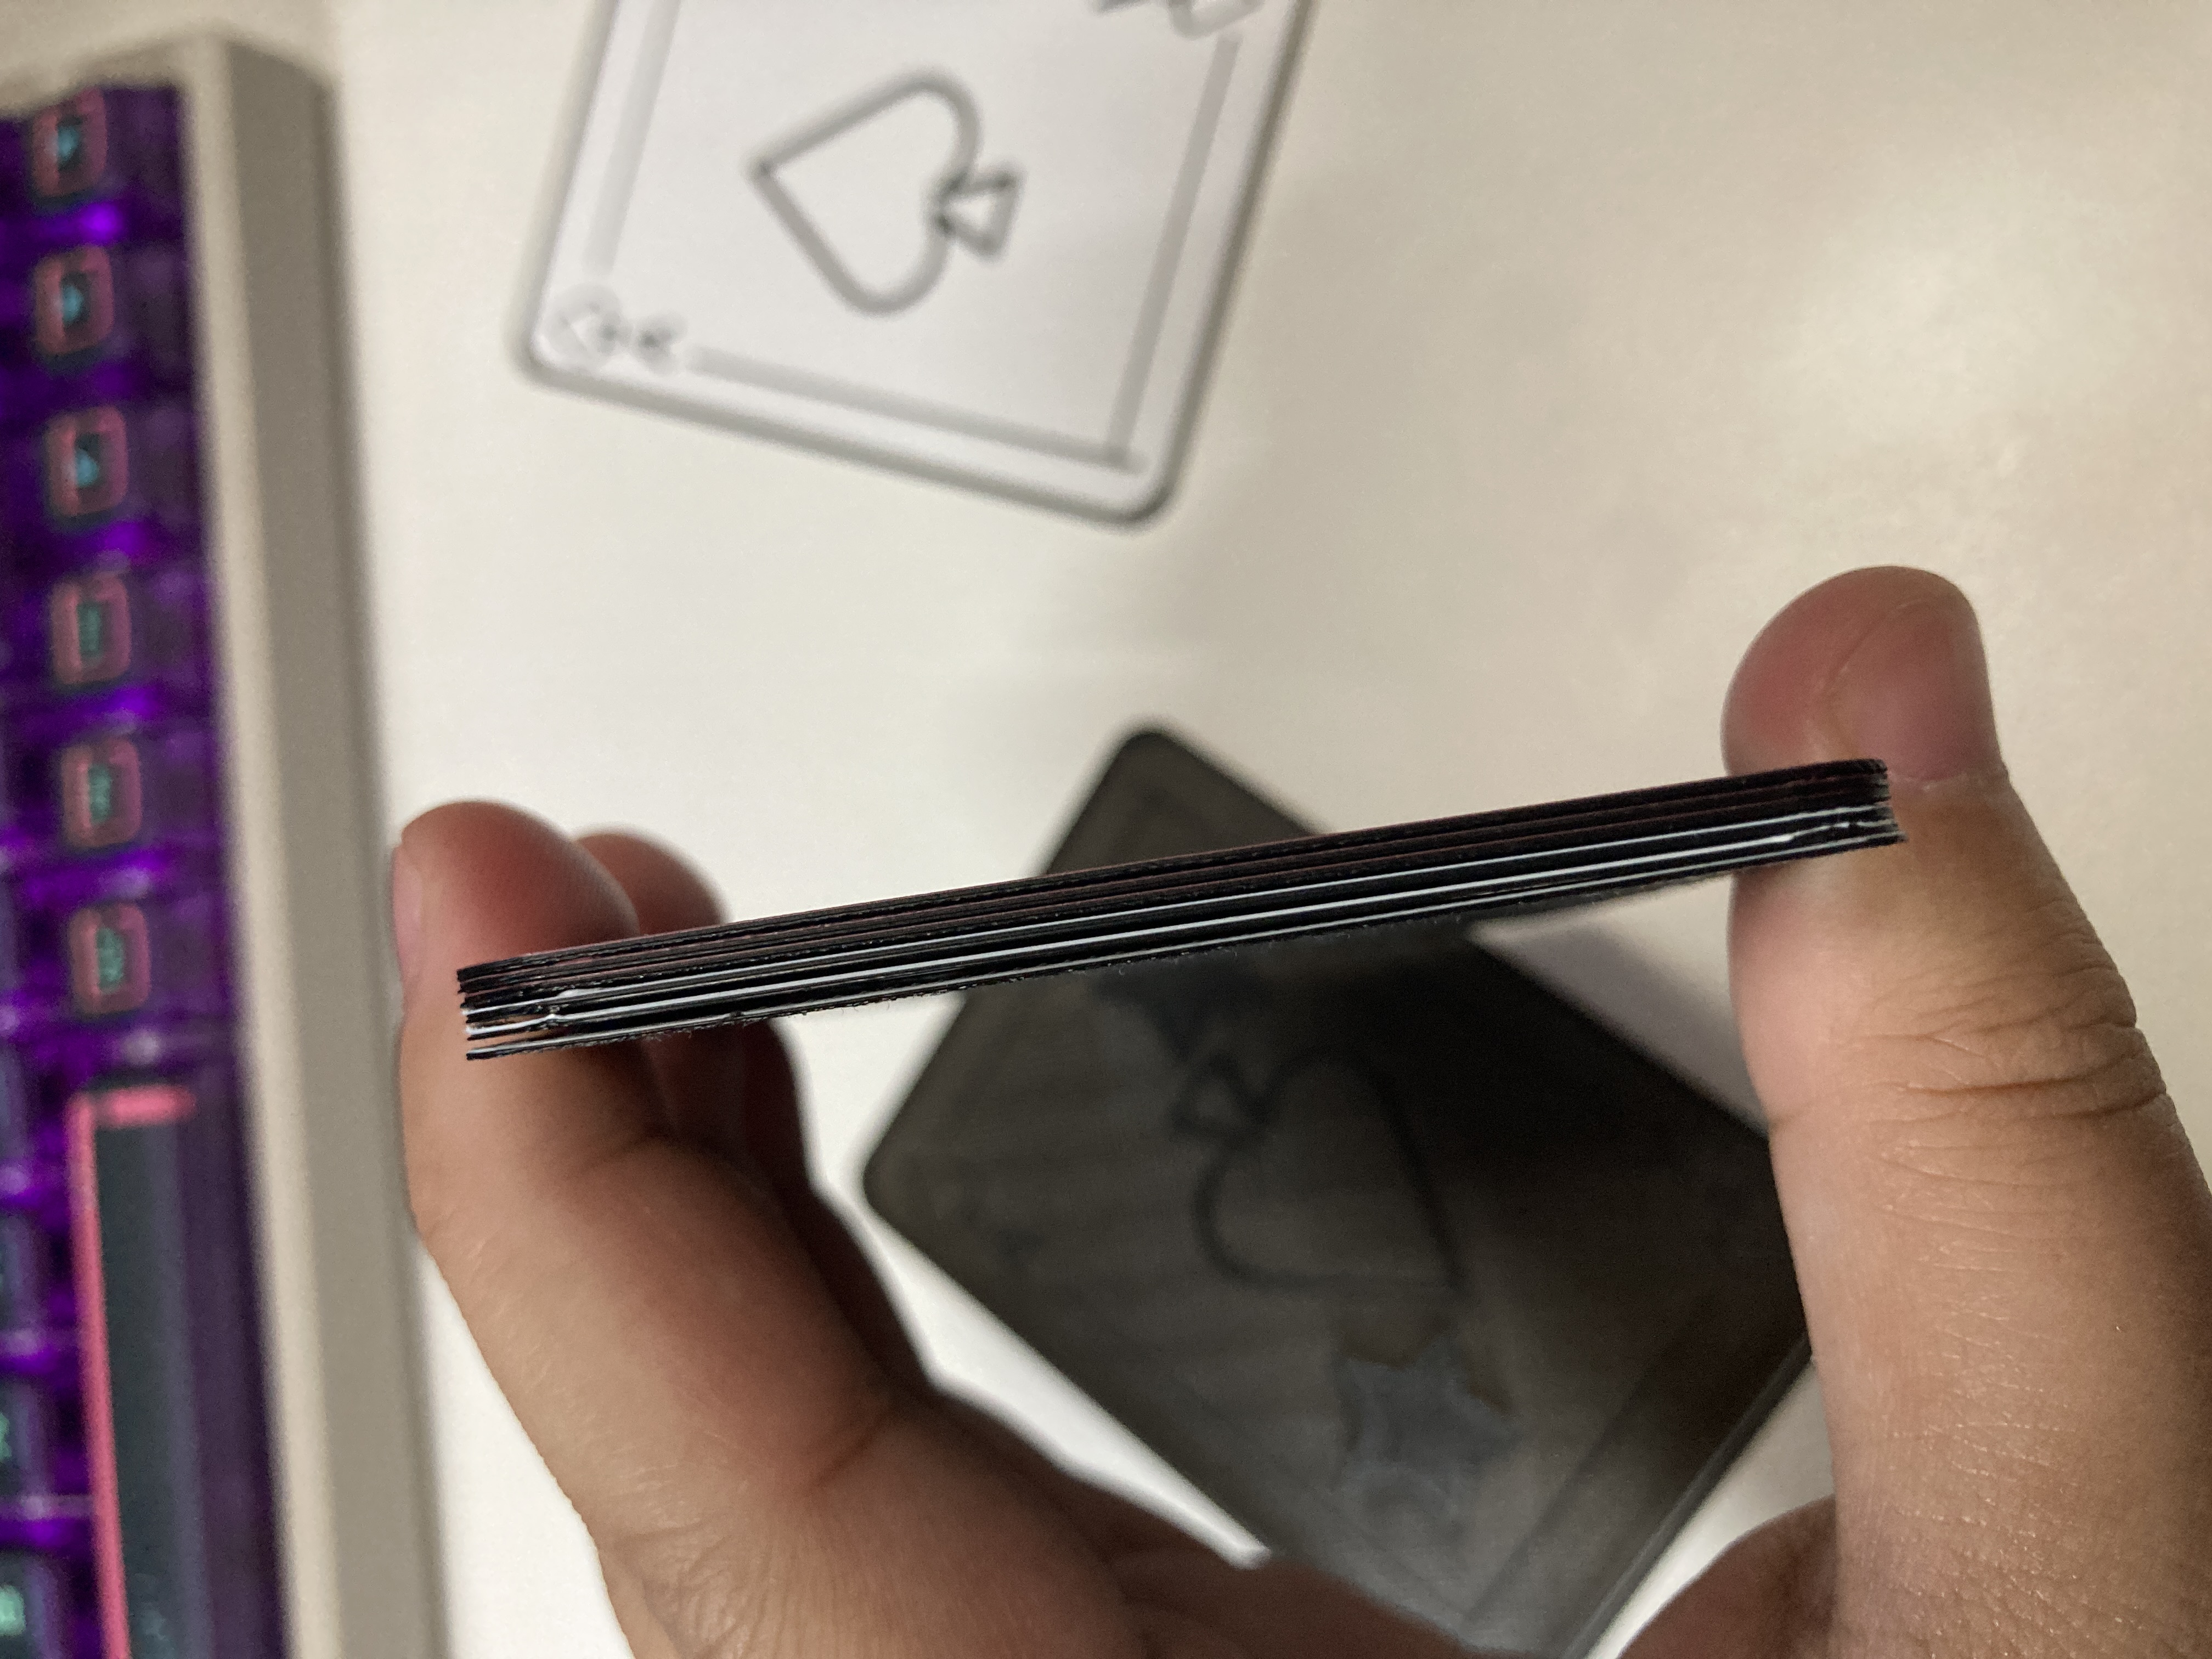
to be valid as actual playing cards, this wasn't gonna fly. i had to change the model again.
luckily i had barely gotten into making the final cards so i easily could go back and adjust the model. another thing to learn from these test prints revealed that with the octagram spiral on the back it made the card too flimsy so i had to adjust the height again to a total of 0.5mm.
after 3 days of fuddling with this, i got some cards! i just had to print them all.
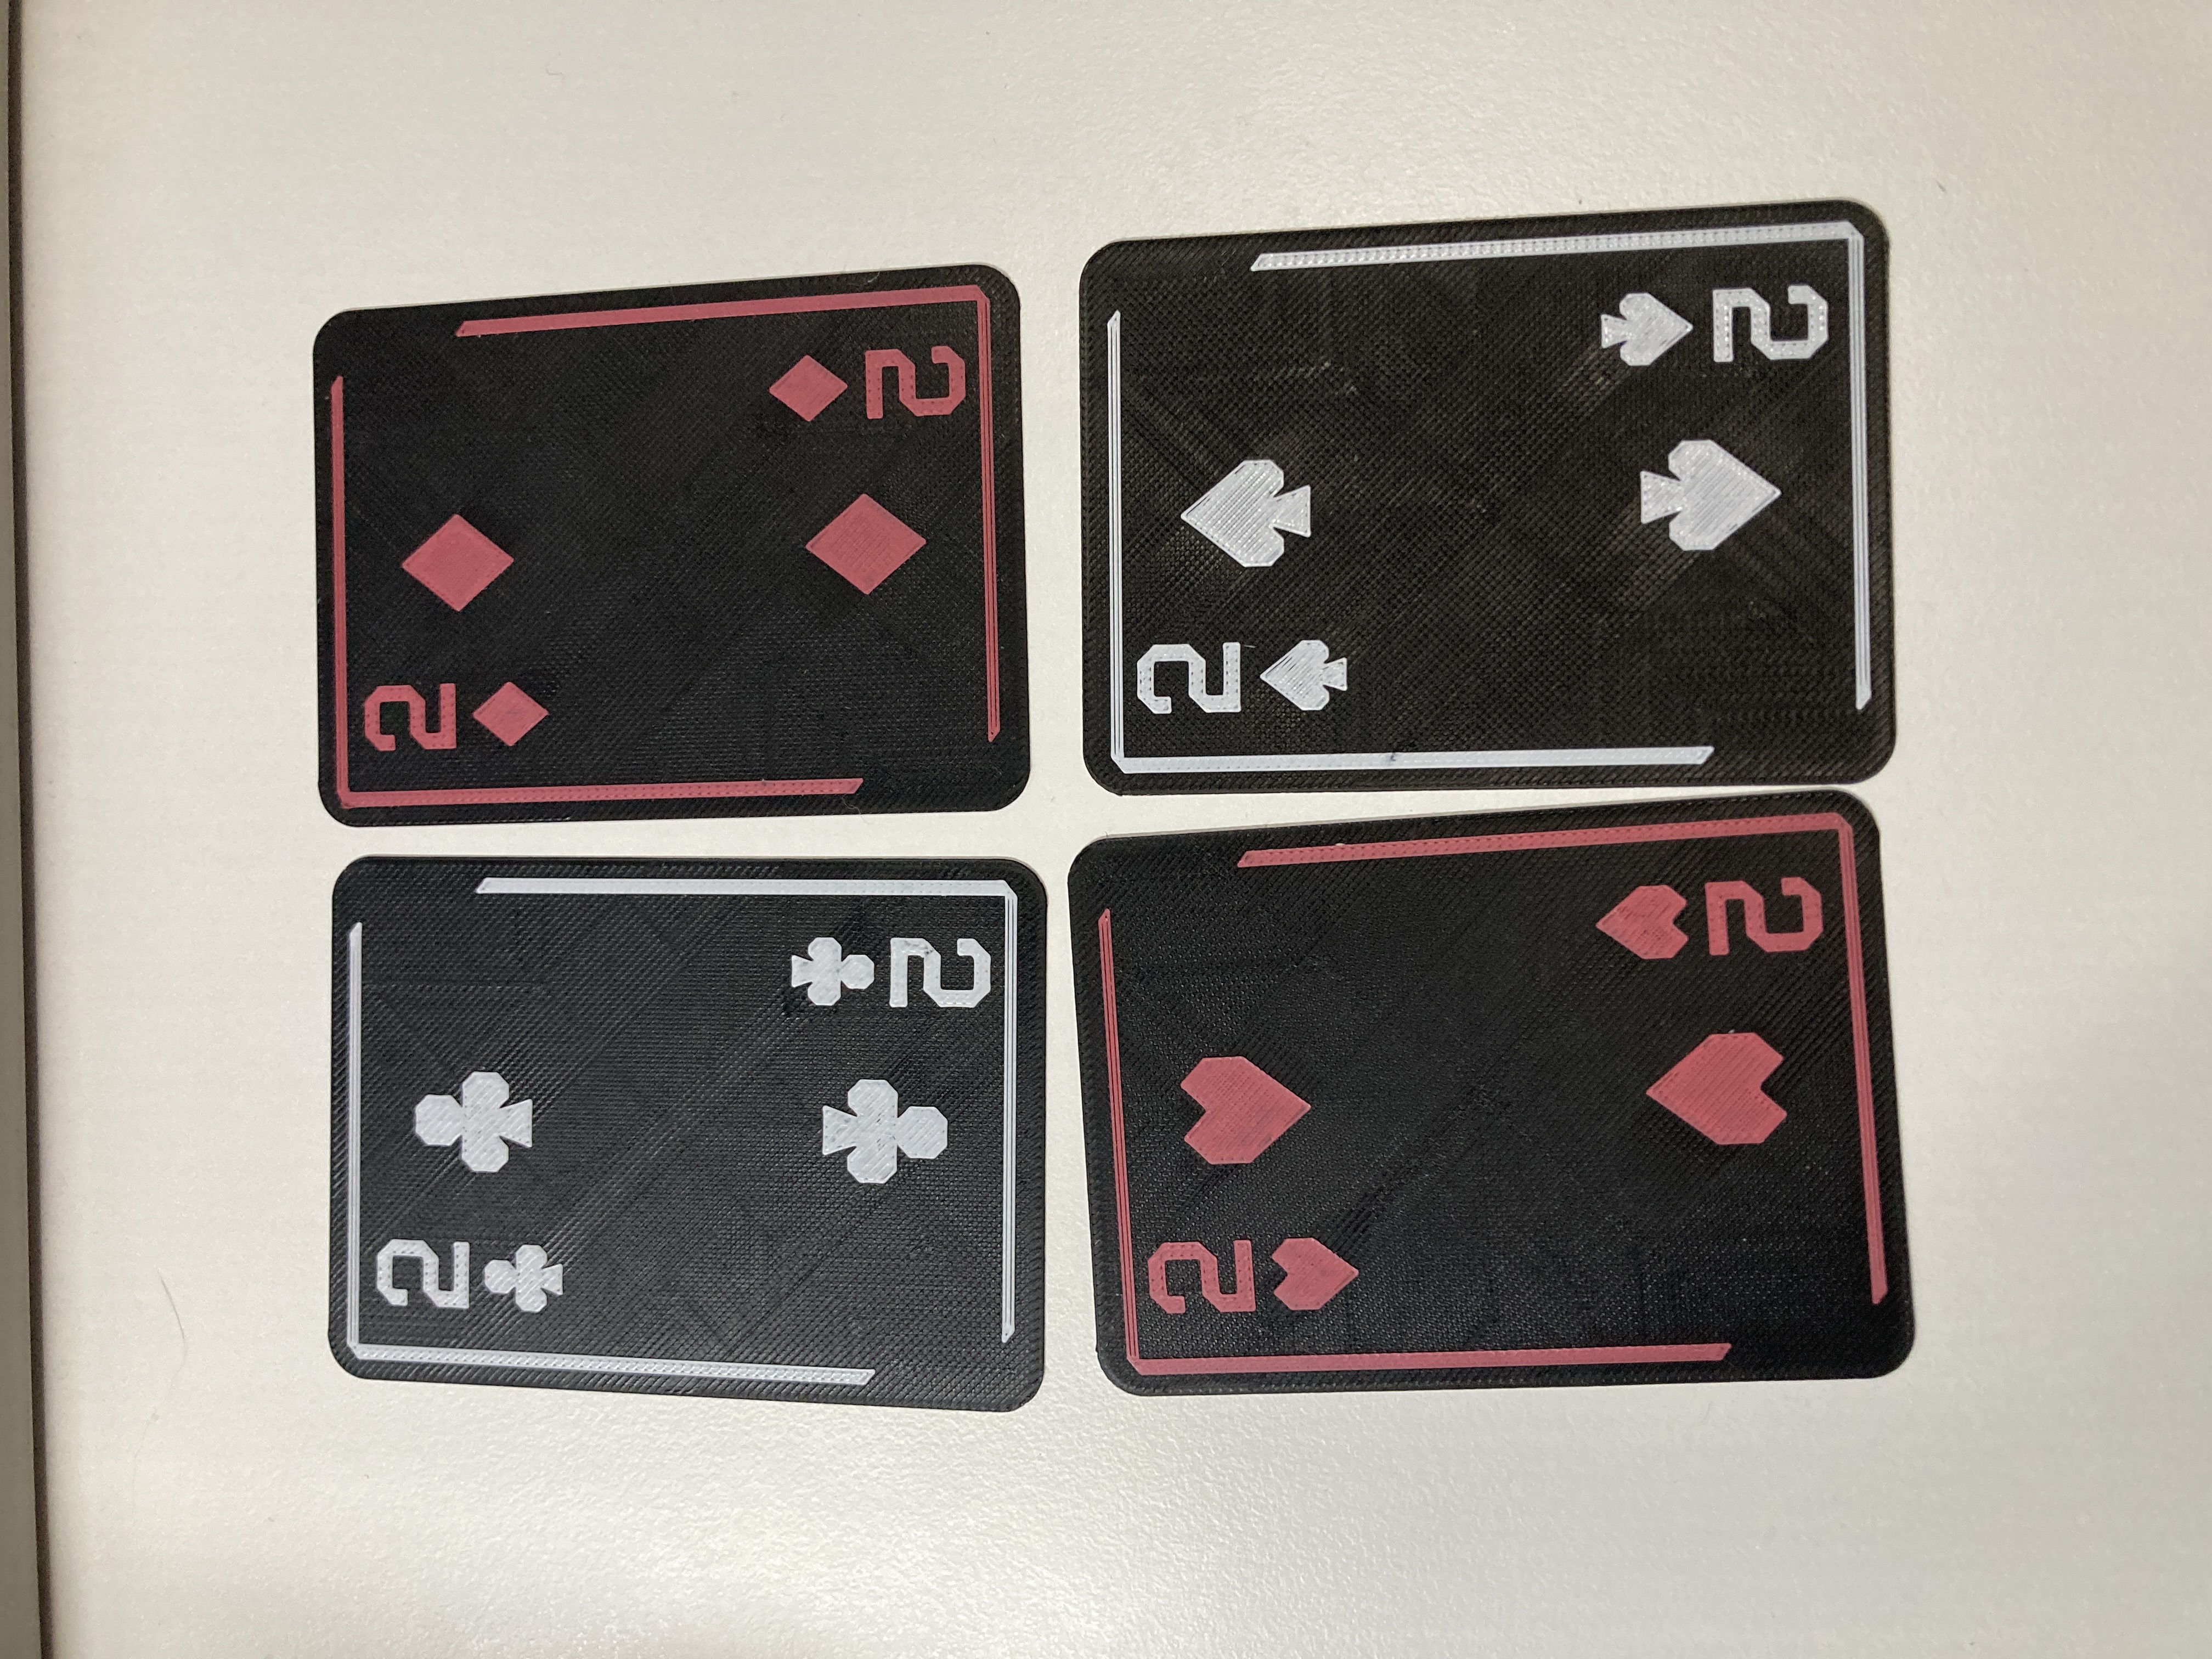
a print of 2 cards was about 25 minutes, 3 cards was about 35, and there was the time needed to replace the filament before it started printing layer 4. so for all 52 cards that was about 9-10 hours of printing, non consecutively but easily done over the course of a weekend. my build plate is small, i started with printing two cards at a time but i quickly fucked up removing a 3 card from the build plate so i moved up to doing 3 cards at a time and being diligent about tracking what cards i had and hadn't printed.
i wasn't keeping track of filament usage, but this print leans more base filament heavy, so if you want to do it yourself make sure you have enough of that color the most. that said, it still isn't a whole lot of filament usage per card overall.
this set of cards also didn't have a joker so i quickly made one based off of the other face cards. this set of cards was CC0, so i was free to do that.
i didn't feel like writing out "joker" so i just made the J from the Jack a lowercase j to differentiate it.
i had to have a box to hold all my new cards, and i didn't feel like making my own box. there's a lot of playing card boxes out there, and i picked this one off of thingiverse to hold my cards. i just made the model wider and it seems to be working just fine. for the record, i edited the 2deck_v2.stl model to have this scale if you just want a copy of that:
after a weekend of printing, my cards are all done!


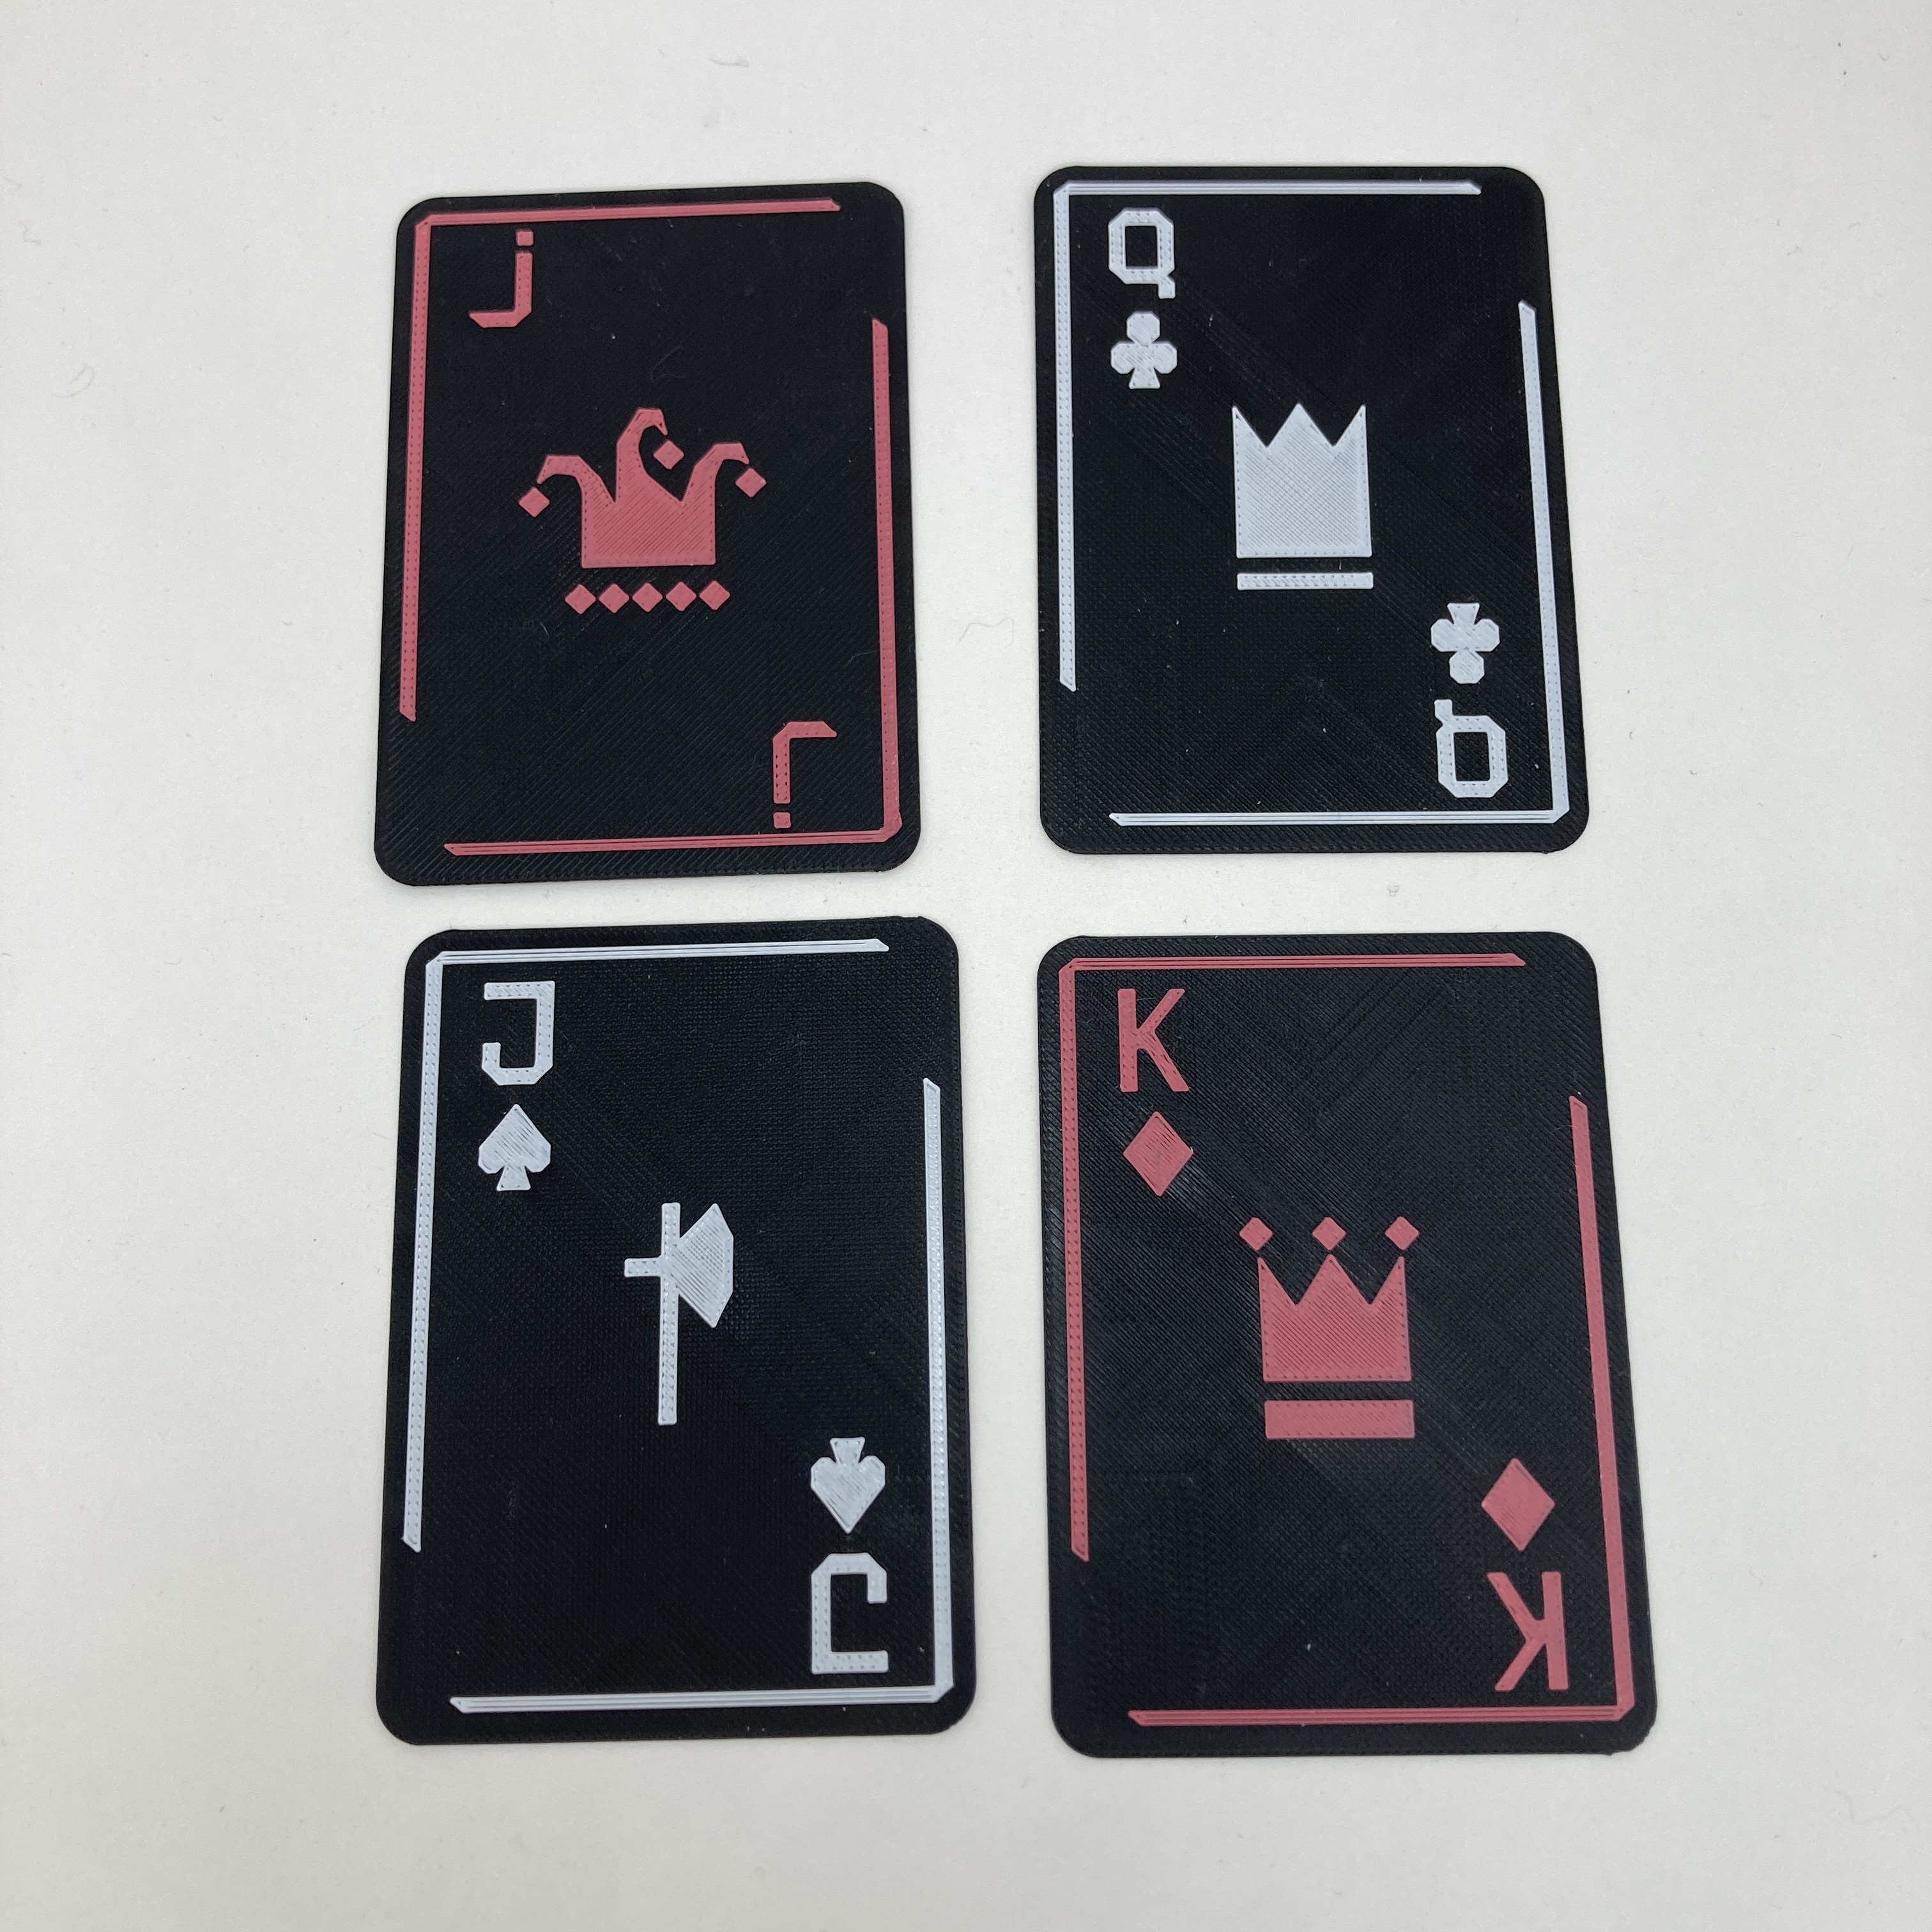
i think these cards turned out great and they were so easily printed over the course of the weekend, i'd just have to get up every once in a while to change the filament but that became really easily after a bit.
if you want to do this yourself, here's the tldr; on how to make these cards:
here's also some slicer settings that i used just in case because i have no idea what slicer you're using:
happy printing!
This is the second in a series of posts about a virtual machine I’m developing as a hobby project called Bismuth. In this edition we’re going to look at the VM’s design for memory management and safety. To start with I’ll remind you of the design goals for this VM as detailed in my last post, with those that apply here in bold:
Not to give away the twist, but when you combine points 2 and 4 with a VM that cares about memory safety (i.e. programs should not be able to do things like read outside of the bounds of an allocated region of memory) things can get a little bit complicated. So let’s walk through the stages of grief that I experienced and the solutions I came to during the bargaining stage when designing the memory management and safety features of the Bismuth VM.
Point 4 says the VM must be easy to implement. In my experience this means the VM must be relatively simple, and as I’m sure we can all agree* the simplest language is C. Why? Because C is basically fancy machine code. Everything’s a number. Can’t get simpler than that. Sometimes the number points to a region of memory where other numbers live. It’s numbers all the way down, and I like that about C. So if we want a VM that’s simple, well, it should be like C, right? Especially since one of the design goals is to have an IR that’s compatible with standard C.
* I’m sure plenty of people will disagree with this, actually.
So that’s easy! When the IR wants to allocate memory, we just put in a call to malloc (or calloc if you’re feeling fancy) and shove the pointer onto the stack. There’s a few problems with this approach, including that on 64-bit systems the pointer would be 64-bit and the VM is a 32-bit machine, but we’ll start with the more obvious one.
You see, C has a problem. If everything is a number, and an array is just some arbitrary region in memory full of other numbers with a number pointing to it, then there’s no reason you can’t just read arbitrarily from anywhere in memory. If you want to look at a number that’s before the start of or after the end of an array, you can totally do that. Nobody’s going to stop you! Well, until your program segfaults anyhow.
These are also called buffer over or underruns, and the Rustaceans tell me those are like, bad? Something about CVEs? I don’t know, I’m just a game developer, we don’t care** about that sort of thing.
** This is a joke, please put down the pitchfork. Although I suppose there was the time Untitled Goose Game had arbitrary code execution in its save system.
So we probably want some kind of sandboxing behavior. After all, accessing arbitrary memory addresses is bad because it can cause the VM to segfault (and a VM should probably never do that) but it’s also bad because we don’t want user programs to be able to poke around in the memory used by the VM itself, because that’s a security risk.
We need some other strategy for separating what memory belongs to a program (and which memory belongs to which program if we can run multiple simultaneously) and what memory belongs to the VM. That means we can’t use malloc and its ilk. Right?
Let me be clear: I’ve written malloc-style heap allocators, composable memory allocators, and a variety of other memory allocators. I’ve written a post on Cohost explaining memory allocators (which I should repost here soon.) I know how memory allocators work and even I can’t stomach the thought of writing another heap allocator.
This is a bit of a problem. Because we can’t use malloc, and we need to have separate memory for the VM and user programs, which means we need separate heaps, which means we need to write a heap allocator.
And I know what you’re thinking: just use one of the C memory allocators with permissive licenses that are freely available on Github! And I too had that thought. But going through all of them I noticed that many don’t have the features I need. For example, a lot of them just function as a drop-in replacement for malloc. That’s great if that’s what you need, but if you need multiple heaps that’s not going to help a lot!
The good ones are also complicated and design goal number 1 was “must be fast” so we need a good one. The good ones with different heap instances are even more complicated. Looking at integrating some of these gave me such an overwhelming feeling of ennui that I thought to myself “I would rather write my own heap allocator.” But I quickly came to my senses and realized that nobody wants to write a heap allocator, not even me, and even if I did there’s no guarantee it’d be fast anyway. I realized that mandating writing a heap allocator or integrating an off-the-shelf allocator was at odds with the design goal of the VM being easy to implement.
Plus while many of those allocators are great, what if you’re writing an implementation of the VM in C#? Or JavaScript? Or Python? Or Lua? Then you can’t use the off-the-shelf ones and still have to write your own. Don’t say it couldn’t happen, I have personally done much stranger things and I’m friends with many sickos who would also do things like this.
So we have to use malloc because it’s fast and eases implementation of the VM. Plus on higher level languages, instantiating an array (or table, yes Lua you can put your hand down now) is conceptually very similar to a call to malloc so things remain very consistent.
But we can’t use malloc… or can we?
Okay, so, theoretically we could implement this VM in something like C#, right? And a “pointer” would just be a reference to an array with some kind of offset. Could we apply that model to malloced memory? Well, of course we can! I mean, that’s basically what high level languages do, right? Allocate some memory and call it an array and provide a reference. So that’s what we have to do, too.
I decided to call these references “handles” because to my mind a handle is an opaque indirect reference to something that you can only really interact with through system or API calls. So a pointer becomes a handle which points to some allocated memory somewhere, plus an offset. Great! What system calls do we need for this system? As it turns out, it’s pretty simple. These are the memory management operations available to Bismuth’s IR:
I’m omitting load/store operations for different bit depths for brevity here.
So the plan is this:
calloc to allocate and zero out some memory, generate a unique value that represents the handle to that memory, and store this information in a hash table with the handle as the key and the pointer plus size as the value. The handle table is unique to each user program, so programs can’t snoop on each other’s memory.This approach will work, though there are a couple downsides that make this more of a compromise than an ideal solution.
First, indirecting every memory access through a table is going to slow things down. I don’t know how much yet, but given there are languages where literally every member access is a hash table lookup, I think it’s going to be fine. There’s probably ways of caching things to improve matters.
Second, C-style pointers become more complicated. Instead of a single integer, it becomes a handle and offset struct. This is fine because I happen to know that the C standard says that pointers need not be integers, only that they can be converted to integers, and even that operation may be undefined depending on the implementation. The fact that pointers are usually simple integers is just a happy coincidence, not mandated by the standard. So you could still implement standard-compliant C on top of this implementation, unless I’m overlooking something. Plus, on a modern 64-bit system the pointer could have the handle value in the top 32 bits and the offset in the bottom 32 bits.
At this point I started happily implementing my VM’s memory management systems, when everything came to a screeching halt. How do I actually generate the unique handle values for the pointers?
My first idea was to just use the pointer itself as the value. That’s certainly the easiest, and guaranteed to be unique. Just one small problem: my OS is 64-bit and my VM is 32-bit. I can’t cram a 64-bit integer into a 32-bit integer, or take a 32-bit chunk of it and guarantee it’s unique. I could make every heap for every program a contiguous chunk of memory (webassembly does this) so that every pointer is always a 32-bit offset from the start of that memory, but then I couldn’t use malloc!
In the before-times there were architectures that had more memory than their system’s word size. For example, 16-bit machines with 24 bits of memory, or 8-bit machines with 16 bits of memory. I could keep my VM using 32-bit integers and just consider handles a 64-bit integer.
This would unfortunately be very messy. Making this change would create a separate class of incompatible values, with “normal” IR operations that expect 32-bit values unable to operate on handles. I’d have to create different versions of relevant operations that work exclusively with handles, and that would greatly increase the VM’s complexity. Suffice to say this would be incompatible with the “must be easy to implement” design goal. So that wasn’t a great fit either.
The simplest idea I had was to just use an incrementing 32-bit integer. Unfortunately that’s only guaranteed to be unique so long as the value doesn’t overflow, which it eventually would. This would still work though if whatever method doles out handle values checks the handle table to see if it contains that value, and if so continues to loop until it finds a handle that isn’t taken.
I didn’t like that for two reasons though:
So, like I always do, I decided to complicate things.
I’m not going to explain everything about linear feedback shift registers here. Partly because I don’t have that kind of time, and partly because I don’t really understand how or why they work, just that they do and that they’re awesome. If you want a thorough explanation you can watch DavidXNewton’s video about them. The short version is that a linear feedback shift register is a simple bit-shifting algorithm that, when using the correct maximum length term, yields an ideal non-repeating series of pseudo-random numbers.
This means that a 4-bit LFSR with the right term will generate 15 numbers, from 1 through 15, in a random order, without repeating any value, until all values have been exhausted. The series of numbers will then loop and repeat. Transport Tycoon uses this for tile updates (see aforementioned DavidXNewton video) and Wolf3D and others use this technique to do fizzle fades.
They’re basically a shuffled list of integers up to N bits in a can, where “can” means “algorithm.” LFSRs are pretty nifty and I’m going to use them for generating handles. The code for them is also short enough that I can show you the entirety of my lfsr.h file right here:
#pragma once
#include <assert.h>

typedef struct lfsr16_t {
    uint16_t value;
    uint16_t term;
} lfsr16_t;

typedef struct lfsr32_t {
    uint32_t value;
    uint32_t term;
} lfsr32_t;

static inline uint16_t shift16(lfsr16_t* inst) {
    assert(inst != NULL);
    if (inst->value & 1) {
        inst->value = (inst->value >> 1) ^ inst->term;
    }
    else {
        inst->value = inst->value >> 1;
    }
    return inst->value;
}

static inline uint32_t shift32(lfsr32_t* inst) {
    assert(inst != NULL);
    if (inst->value & 1) {
        inst->value = (inst->value >> 1) ^ inst->term;
    }
    else {
        inst->value = inst->value >> 1;
    }
    return inst->value;
}
Feel free to use the above code snippet in your own projects if you like.
The fact that LFSRs never produce the number zero is also quite handy because it means we can just designate a handle of 0 as effectively the same as NULL. Neat!
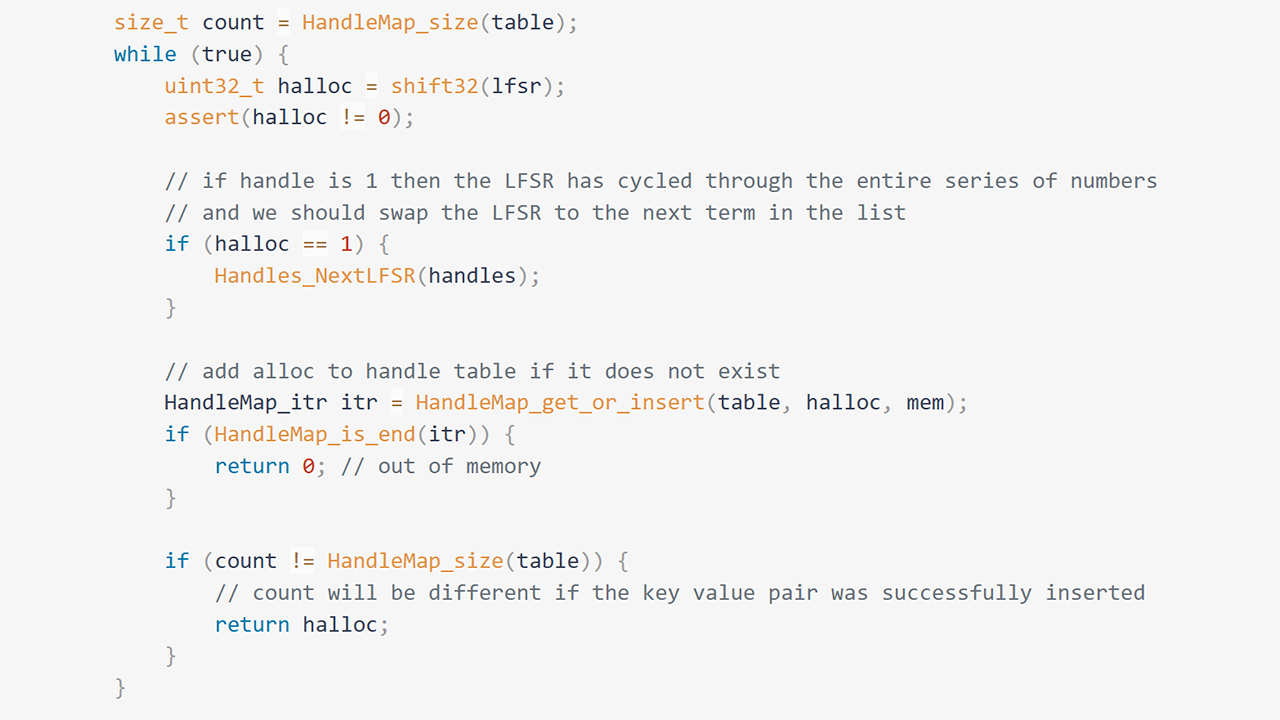
Here’s how the VM generates new handles:
This may sound more complicated than it really is, so I’ll go through the relevant bits of code to show it’s not so bad. This is the function for initializing the handle manager for a user program:
static inline char* Handles_Init(HandleManager* handles) {
    handles->InitialTerm = rand() & RANDOM_TERM_MASK;
    handles->NextTerm = handles->InitialTerm;
    Handles_NextLFSR(handles);
    HandleMap_init(&handles->Table);
    return NULL;
}
Select a random initial term index, set the next term index to the initial index, (the Handles_NextLFSR function will use, then advance it) initialize the LFSR, then the hash table. Next is the function which initializes the LFSR:
static inline void Handles_NextLFSR(HandleManager* handles) {
    lfsr32_t lfsr = { 1, lfsrterms32[handles->NextTerm++] };
    handles->LFSR = lfsr;
    if (handles->NextTerm >= HANDLE_TERMS_COUNT) {
        handles->NextTerm = 0;
    }
    if (handles->NextTerm == handles->InitialTerm) {
        handles->NextTerm++;
        if (handles->NextTerm >= HANDLE_TERMS_COUNT) {
            handles->NextTerm = 0;
        }
    }
}
Pretty simple. Set the value to 1, and the term to whatever is in our terms list at the NextTerm index, then increment the next term index. If that index overflows, set it to 0. If the next term index is the initial term’s index, increment to skip it and check for overflow again. Finally here’s the snippet that generates the handle:
size_t count = HandleMap_size(table);
while (true) {
    uint32_t halloc = shift32(lfsr);
    assert(halloc != 0);

    // if handle is 1 then the LFSR has cycled through the entire series of numbers
    // and we should swap the LFSR to the next term in the list
    if (halloc == 1) {
        Handles_NextLFSR(handles);
    }

    // add alloc to handle table if it does not exist
    HandleMap_itr itr = HandleMap_get_or_insert(table, halloc, mem);
    if (HandleMap_is_end(itr)) {
        return 0; // out of memory
    }

    if (count != HandleMap_size(table)) {
        // count will be different if the key value pair was successfully inserted
        return halloc;
    }
}
Get the LFSR to spit out a new value, and if that value is 1 set up the next LFSR. 1 is still a valid handle value though, so we can still use it. Try to insert the handle into the handle table, returning the NULL handle to indicate failure if out of memory. If the handle was successfully inserted, return the handle value, otherwise try again.
I think this is a pretty robust process for generating unique and pseudo-random 32-bit handles to 64-bit pointers, and it avoids some obvious security pitfalls. There might be some I’m overlooking, but I can’t think of them. If you can think of anything I’ve missed, let me know in the comments.
Though this is the recommended way of doing it I probably won’t mandate in the VM’s specification that handle generation is implemented this way, in service of the “must be easy to implement” design goal. I’ll probably just leave it implementation defined. There’s loads of scenarios where a simple incrementing integer would probably be just fine.
So now we can allocate memory, access it via handles, and free it, and nobody ever needs to write their own stinkin’ memory allocator, fabulous! But astute readers may have noticed there’s a missing operation for handles.
Later, when I was working on a language to sit on top of the IR and thinking about things like borrowing references, I realized an interesting property of this fancy handle indirection system. Using realloc in C has the annoying property that the pointer to your memory might wind up somewhere else because the previously allocated memory can’t be grown to the new size. In that case C allocates new memory of the appropriate size and copies the relevant sections of the old memory, and returns the new pointer.
But our VM uses handles, not pointers. The underlying pointer and size can change without having to change the value of the handle. This is great news for the final part of the memory management API:
NULL handle on failure.So reallocating memory in our VM will never mutate the handle. It either succeeds and the handle stays the same, or it fails and doesn’t affect the memory pointed at by the handle at all. I’m not sure how helpful this is truly going to be, but I think it’s a pretty neat side effect of the system. It’s like getting object references for free!
That concludes the memory management and safety design of the Bismuth VM. It’s not perfect, some compromises had to be made, but all in all I’m quite pleased. It hits all 3 of the relevant design goals and while it’s not as fast as one might like I think it’s fast enough. It’s compatible with the C standard. And importantly it keeps the VM much easier to implement, by not forcing anyone to deal with custom heap allocators.
I hope you’ve found this interesting, and that you’ll join me for the next post.

honestly, i've been killing a lot of free time lately by working on random tools and non-game projects. i feel kinda guilty for this, because i should be working on my big game projects (like IRIDIUM VERTIGO) but i just haven't had the motivation for it. oh well! i'll get back to it eventually...
here's some stuff i've done in the last week or so: